Whether you want to leave your day job or simply want to earn some extra money as a side income, Blogging is one of the best ways to win your freedom.
Many people use Blogging to build a personal brand and get more clients, increase sales for products or services, etc.
But Blogging is not limited to these only.
Take a look at how starting a blog can change your life.
- Want to express yourself and share your passion? Start Blogging.
- Want to share your knowledge and earn a living? Start Blogging.
- Want to refine your writing skills and become a better writer? Start Blogging.
- Want to build an online portfolio and market your services? Start Blogging.
- Want to become an authority expert in your industry? Start Blogging.
I can go on and on about the various benefits of blogging. But I think it’s better to share my own story and how I benefited from blogging.
From being completely broke after not being able to pay for my higher education, to sponsoring a scholarship for over 50 students in the last 4 years, starting a blog has completely changed my life.
I started blogging as a passion in 2011 but later it became a necessity and now I blog for a living.
If you are thinking of choosing to blog as a career, pat on your back because you are going to be in one of the best professions with unlimited possibilities.
Unlike others who hate their corporate job but still can’t escape the 9-to-5 rat race, you are on your way to being your boss.
No deadlines, no terms! Live your life on your own terms! Welcome to the amazing world of Blogging!
But let’s face it…if you are a complete beginner who wants to start a blog, starting a blog is not easy.
The reason for this is: there are loads of information available on the internet. The huge information overload can be overwhelming. And you end up doing nothing at all.
However, to make it easier for you to get your blog up and running today, I have come up with this 5-Step Process to Start Your Professional Blog today.
No matter whether you are a complete beginner with no coding skills or already know about blogging, this article will walk you through the complete process of starting a blog step by step.
- Step #1: Pick a Profitable Blogging Niche that You’ll Love Blogging About
- Step #2: Choose a Perfect Blog Name (also known as Domain Name) for Your Blog
- Step #3: Choose an Easy to Use Blogging Platform to Launch Your Blog
- Step #4: Find a Web Hosting Provider to Take Your Site Live
- Step #5: Change Your Blog Theme to Design a Beautiful Blog
Step #1: Pick a Category of Topics You’ll Blog About
Contents
- Step #1: Pick a Category of Topics You’ll Blog About
- Step #2: Choose A Perfect Domain Name for Your Blog
- Step #3: Choose WordPress to Launch Your Blog
- Step #4: Find a Web Hosting Provider to Take Your Site Live
- How to Start A Blog in 10 Minutes? Step-by-Step Tutorial for Creating A WordPress Blog
- Step #5: Change Your Blog Theme to Design a Beautiful Blog
Before you create your blog, you need to decide on your blogging niche and a few other crucial elements that will turn out to be very important in your blog’s success.
But wait, do you know what these terms are?
What is a Blogging Niche?
A blogging niche is a category of topics your blog will be about.
Before you create your blog, you need to choose which topics you’ll be writing about on your blog.
These topics may be anything of your interest, but are limited to a definite category set of topics.
For example, if you want to write about photography tips on your blog, your blogging niche should be photography, you can’t write about health tips on the same blog.
Warning: But make sure you choose the blogging niche in the topics of your interest – something you are already passionate about.
Why do I need to Choose a Blogging Niche?
Write about one category of topics, and you’ll become an expert. Write about everything and no one will notice you.
The opposite is also a true, but more powerful piece of advice:
If you want to become an expert in your blogging niche and want people to follow you, you need to pick one blogging niche and stick to that.
People love to learn from experts and not from any random guy who talks about everything.
If you want to get lost in the crowd, start writing about everything on the same blog – health and fitness, tech, politics, news, photography, etc.
But I like writing about everything, what in that case?
When you are passionate about everything, you are not passionate about anything. You are telling a lie to yourself.
Why?
Because one can’t be passionate about everything.
Although there are scenarios when people can write about anything, that’s rare.
If you belong to such a category of people and are passionate about 3-4 categories of topics, you should pick the best one among them.
Ask yourself what you love the most among those categories, and pick the one you are most passionate about.
What is the Target Audience?
An audience is a group of people who might be interested in listening to you – whether reading your blog, listening to your podcast, watching your video, or simply listening to your advice.
Think of your best friend who always listens to your advice, he/she can be your audience.
But since you can’t have thousands of such friends, you obviously need to find an audience who will read your blog.
Think of a group of people who might be interested in your blog or the services you’ll offer. That group of people is your target audience.
For example, if your blog is about photography, people who are passionate about photography are your target audience.
One of the primary goals for the existence of your blog is to serve your target audience.
Educate them with your blog content, and help them fulfill
what they want to achieve.
Will defining my target audience limit my blog growth?
Most people think that choosing a target audience will limit their blog growth, but in reality, it increases the chances of blog success.
Why?
There are two reasons:
1. You can’t please everyone. If you try to please everyone, you’ll be a loser.
For example, with your photography niche blog, you can’t please a person who is passionate about coding.
2. Blogs with a specific set of audiences tend to perform better in Google and other search engines’ search results because Google and most other search engines believe such blogs as an authority in their niche.
So defining your target audience is more beneficial in reality. But when choosing your target audience, keep room for broadening up your niche later.
Hope you got the answer, now wait for a second or two and ask yourself the following questions to pick your Blogging Niche:
- What your blog will be about?
- Who will be your target audience?
- And, how will you make money from your blog?
There is a huge conflict between people’s ideologies about building an audience first or making money first.
Most people will suggest you build an audience first before you think about making money from your blog.
But my point of view is the opposite of that.
You need to think about money first because you are not blogging for charity.
Although you’ll need an audience to make money from your blog, you need to think of the profitability of your blog first.
Because there is no point in building a huge audience and later realizing that you can’t monetize them as your audience only loves freebies, they are not willing to pay for anything.
So knowing the profitability of your blogging niche is crucial before you even start your blog.
Here is a detailed guide for finding a profitable blogging niche.
Step #2: Choose A Perfect Domain Name for Your Blog
Before I reveal my 6 amazing tips for choosing a domain name, let me answer what this term is.
What is a Domain Name?
A domain name is a way of telling people where they should find your business on the internet. It is like a physical address of your shop if you consider your blog or business website as an online shop.
For example, when you type Facebook.com in your web browser, it loads a social media website whose name is Facebook.
So Facebook is the name of the social website and facebook.com is its domain name.
Choosing a perfect domain name is very crucial, and I follow these 6 tips for domain name selection.
- Decide whether a personal brand or a professional brand. For example, facebook.com or markzuckerberg.com
- Choose a domain name that reflects your blogging niche. For example, if your blogging niche is photography, prophotography.com is a good domain name.
- Avoid using numbers and hyphens in the domain name. For example, face-book.com and facebook9867.com are bad domain names because they are confusing and difficult to remember.
- Avoid repeating characters. For example, smallloveethics.com is a bad domain name, why? Because there are 3 times repeating l (
lll ) and 2 times e (ee) which makes it more prone to typing mistakes. - Finally, keep it short and simple.
Your domain name should be short and simple so that users can easily type and remember it. For example, techreviewpro.com is a good domain name because it’s short and easy to remember. - Your domain name should be unique and not match the same as other existing blogs. Use the tool, namechk.com, to verify if your domain name is unique.
Now you must be thinking about each of these tips and brainstorming domain name ideas. But don’t overthink it.
Why?
Because, when I was starting my first blog, I spent many weeks choosing the domain name for my blog.
I don’t want you to go through the same misery.
While these tips can always help you choose a perfect domain name, but let’s not make it overcomplicated.
Simply choose any good domain name and get started.
Why?
Because, even if you got the wrong domain name, you can always change your domain name later.
I have seen many professional bloggers doing it and still, they are successful.
Even I did it myself. The blog you are reading was originally RahulDubeyOnline.com.
Changing the domain name these days is not as complicated as it was years ago. So relax.
Rather than wasting time figuring out a perfect domain, simply choose any good one and get started with blogging.
Step #3: Choose WordPress to Launch Your Blog
Once you are ready with your blogging niche and domain name for your blog, you need to choose a blogging platform.
But wait, do you know?
What Is A Blogging Platform?
A blogging platform is where you manage your blog. To manage the way your blog looks and what it shows in the front end, you as an admin, manage that from the back
end.
Every change to your blog is made from the back end. In the back end, you need a CMS (content management system). The CMS for blogging is also known as a blogging platform.
While choosing a blogging platform, you need to ensure that the blogging platform is easy to use and secure enough.
Though there are many blogging platforms in the market, some are free while others are costly.
Several years back, I started my first blog on a free blogging platform and later realized that I wasted a couple of months because they didn’t allow me to
Also, later my blog was deleted for no reason.
Blogspot, WorPress.com, Joomla, Tumblr, Medium, Movable Type, etc. are free blogging platforms.
But the biggest problem with the free blogging platform is: that you don’t own your blog.
They control your blog for their benefit and can delete your blog anytime for no reason.
Thus, you end up wasting months or even years of hard work when you choose a free blogging platform.
I highly recommend you launch your blog on self-hosted WordPress.
However, don’t get confused! There are 2 types of WordPress blogs:
- WordPress.com offers a very basic and entry-level package. It doesn’t allow you to customize your blog name with your own custom domain name of your choice. Also, it comes with many limitations, and you can’t monetize it. It shows its own ads on your blog and keeps money with itself. It costs $99 per year if you want your domain name or remove the ads. Don’t go with WordPress.com.
- WordPress.org: This is highly recommended. It is a free platform that is used by almost most of the successful sites on the entire internet. WordPress.org is a self-hosted blog. You are in total control. You can do almost anything with your blog. And even if you change your mind later and want to add more functionality, you are just a few clicks away. No coding skills are required.
| WordPress.com | WordPress.org |
|---|---|
| Hosted on WordPress.com | Hosted on your own server |
| No custom domain | Use Custom domain |
| Basic and entry level package | Advanced with powerful features |
| No customisation allowed | Customise the look and design the way you like |
| Shows ads on your blog and keeps money | You have total control of monetisation and you keep all the money |
| Charges $99 per year to remove ads | Completely free for lifetime |
| You can't add more functionality later | You can add more functionalities later |
| Can be deleted anytime | You are the only person who can delete |
| Lots of terms and conditions to follow | You are the boss |
| Not recommended | Highly recommended |
Now that you understand the differences between the two. It’s quite clear that the self-hosted WordPress.org blog on your server is the clear winner.
Why?
Because you are limitless with a self-hosted WordPress blog. You can do almost anything. For example, if you want to add an eCommerce store like Amazon on your blog later, you can simply install a free plugin and get your store ready within a few clicks.
WordPress has tens of thousands of free plugins, themes, etc. And adding the store is just an example, you can do anything.
Now that you have already learned:
- how to pick a profitable blogging niche before starting a blog,
- How to choose a good domain name for your blog and
- Which is the best blogging platform for your blog,
It’s time to install WordPress on your server.
Step #4: Find a Web Hosting Provider to Take Your Site Live
Are you ready to take your WordPress blog to live? Let’s learn how to launch your WordPress blog on your own server so that you control it.
To host your WordPress blog, you need a web hosting server.
But wait, do you know what is a web hosting server?
What is a Web Hosting Server?
To understand what is a web hosting server, you need to first understand the mechanism and workings of a website or a blog.
A website or blog is basically a collection of files. When a user enters your blog/website URL in his/her web browser, the user is basically requesting a bunch of files that exist on the requested webpage.
The URL being pointed to an IP address, and the browser fetches information from that IP address (when the URL is requested) and downloads the webpage from the server so that it can show you that webpage in your browser.
The downloaded webpage is a portion of the collection of files from the server of that IP. All these files are live and hosted on the server.
To make it less complicated, a web hosting server is where all the files (including images, videos, text, HTML, codes, user details, etc.) are stored and live on – just like you store your files on your local computer.
Why do I need a Web Hosting Server?
Now, you must be thinking, can I host my website files on my local computer?
Of course, you can! But it’s practically not possible. Because every time a user requests your webpage files, your computer needs to be turned on to serve those files, and also when hosted on a local storage drive, the page can only be accessed via the local area network (LAN) within your office building or even within your room only.
To make it live all over the world, you need a public IP.
Also, since thousands of users can visit your webpage at a certain time, you need a high-quality server with good resources to handle your website files and user requests all over the world.
In other words, without a hosting server, creating a website/blog that is publicly accessible all over the globe is not possible.
Having a hosting server is a must to take your site to live so that it can be globally accessible.
How to Choose a Web Hosting Server?
After reading so far, you must have understood that you need a premium quality hosting server where you can host your website files, and more importantly, the web hosting service provider needs to be trustworthy.
There are a huge number of web hosting services available in the market, but not all are trustworthy.
You need to choose a good hosting server that is not very costly.
Unfortunately, this is where many beginners make mistakes.
When I was starting my blog, I kept reading about web hosting services for many weeks and finally selected a web hosting company that was cheap (in my budget) – needless to say, I didn’t have a huge budget since I wasn’t earning anything when I was starting.
After hosting my site for 2 weeks, I came to realize that the customer support of that web hosting company was pathetic.
As a beginner, you make mistakes many times and might break the site. Hence, you need a hosting company that is ready to provide you with live chat support or support over phone calls whenever you need their help.
I selected that hosting company because I only cared about saving my money and found that it was under my budget. But I ended up regretting it later.
Why?
It’s because there are a few more important factors that you need to consider when choosing a web hosting service provider:
- Know which type of hosting server you need – shared, VPS, dedicated, or cloud
- Decide what type of site you are building – blog, portfolio, e-commerce store, online store, or static website with few pages, etc.
- Understand how many resources (RAM, Storage, bandwidth, data transfer, security, support, uptime, reliability, etc.) you require
- Know the pricing and decide how much you need to pay
- Check if there is an easy way to upgrade your server later if your traffic increases and the site grows
If researching all these seems complicated to you, let me help you choose the best web hosting service provider for your blog.
Rather than providing you with a list of many web hosting service providers, I’ll recommend you choose Bluehost.
Why?
Because this is where I host many of my money-making blogs. They offer very high-quality service at an affordable price. Their server is very fast, that’s why websites/blogs hosted on Bluehost load very fast.
Now, website loading speed is a crucial factor in maintaining your Google ranking, I highly recommend you choose a fast server like Bluehost so that you can avail the benefits of having a fast-loading website.
Apart from the top-notch service and fast-loading server at a very affordable price, what I love most about Bluehost is their industry-standard customer support.
Having a hosting service provider with amazing support is mandatory because when you are starting out, you might make some mistakes, and it’s up to them to help you fix that and get everything going.
With managed WordPress hosting of Bluehost, you’ll never have to worry about breaking anything as their 24×7 support team is just a few clicks away.
That’s why I highly recommend you choose Bluehost over other hosting service providers. And I’m not alone, Bluehost has also been recommended by official WordPress.org since 2005.
Now that you know which hosting service is right for you, let’s quickly get started with your blog setup process.
How to Start A Blog in 10 Minutes? Step-by-Step Tutorial for Creating A WordPress Blog
Watch this video for the step-by-step guide to creating a professional WordPress blog:
If you prefer reading, stay tuned because, in this article, I’ll guide you through the process of buying a domain name and web hosting server.
I’ll also help you install WordPress on your hosting server so that you can set up your blog for professional WordPress blogging.
So just follow the step-by-step process of creating a professional WordPress blog as no technical or coding skills are required to start a new blog.
Follow these steps to get a domain name and hosting server for your new blog:
Step 1: Visit the Bluehost pricing page and choose a plan.
Bluehost offers 3 types of web hosting:
- Shared hosting: Best for starting a website or blog
- Online Stores Hosting: Best for selling, shipping, and processing payments with WooCommerce
- Managed WordPress hosting: Best for scaling a quickly growing website
Shared hosting is perfect for starting a blog, more precisely, starting a WordPress blog.
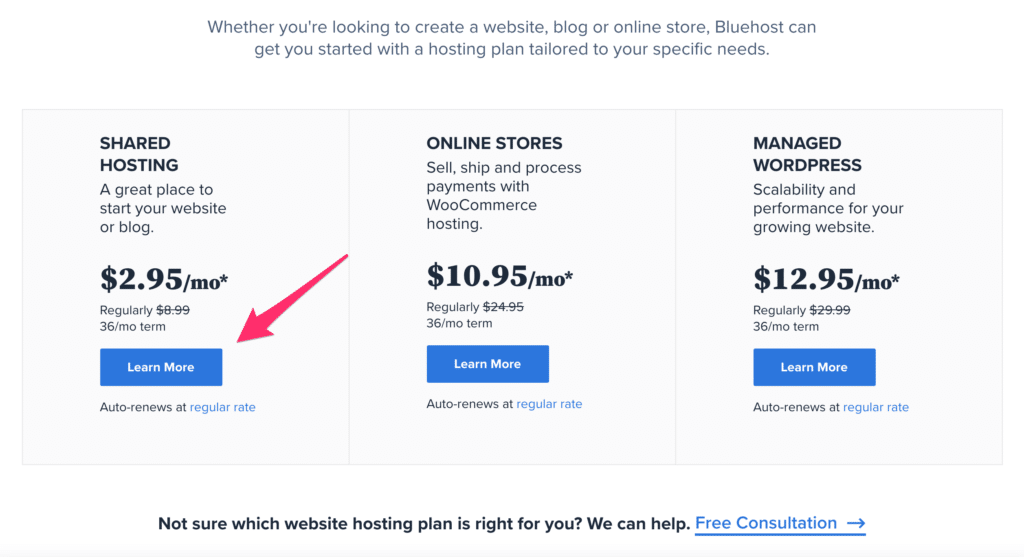
Because, when you are a beginner, the blog you’ll be creating will be completely new and won’t require many resources. So I wouldn’t recommend you pay for higher plans and packages, because I want to save you money.
Instead, get started with the Basic plan of shared hosting.
With the Basic plan, you can host 1 domain, while on the other plans (Plus and Choice Plus) you can host unlimited domains.
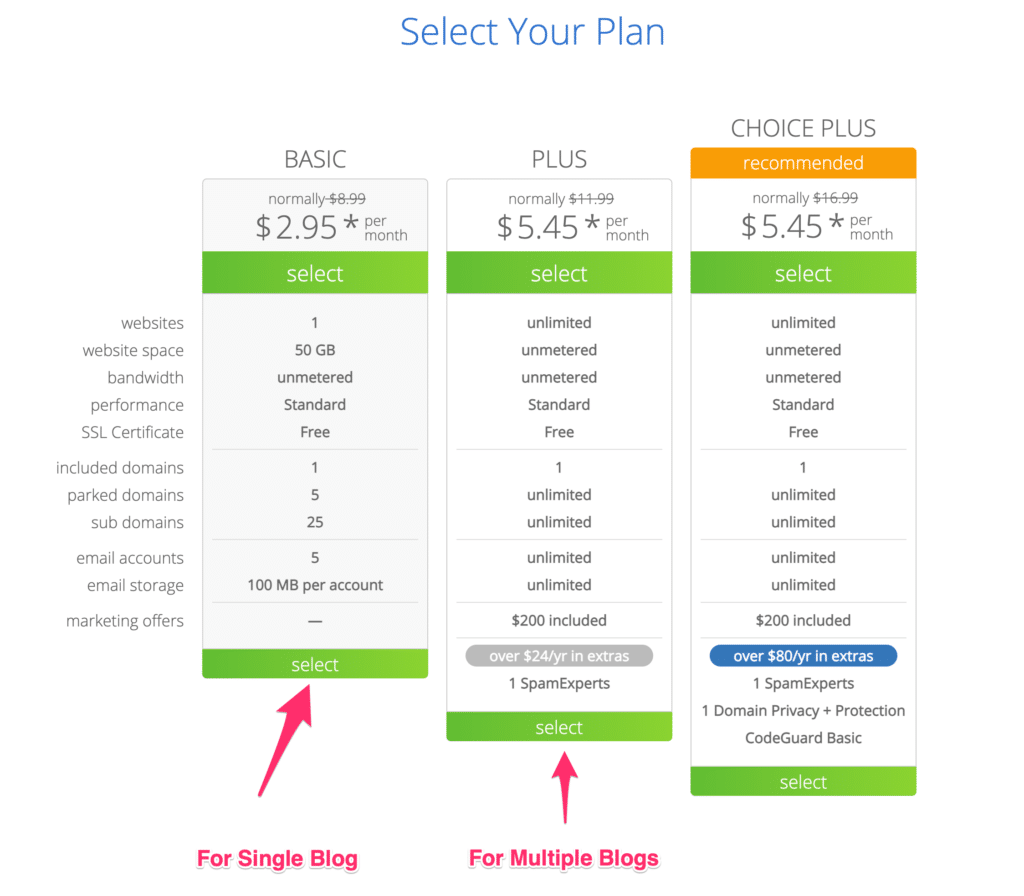
If you need to start one website/blog, choose the Basic plan, while if you want to start more than one blog, you can choose the Plus or Choice Plus plan.
But, I would suggest you choose the Basic plan because that’s the best option when you are starting, and you need to host only one blog.
And, if you ever need to start more blogs/websites, you can always upgrade to a higher plan later within just a few clicks.
Step 2: Register your domain name
As soon as you click the Get Started button on the pricing page, it’ll ask you to choose a domain.
Here you get three options:
- You may create a new domain name
- You may use an existing domain you own
- You may skip this step for now and quickly grab your hosting account and choose the domain later.
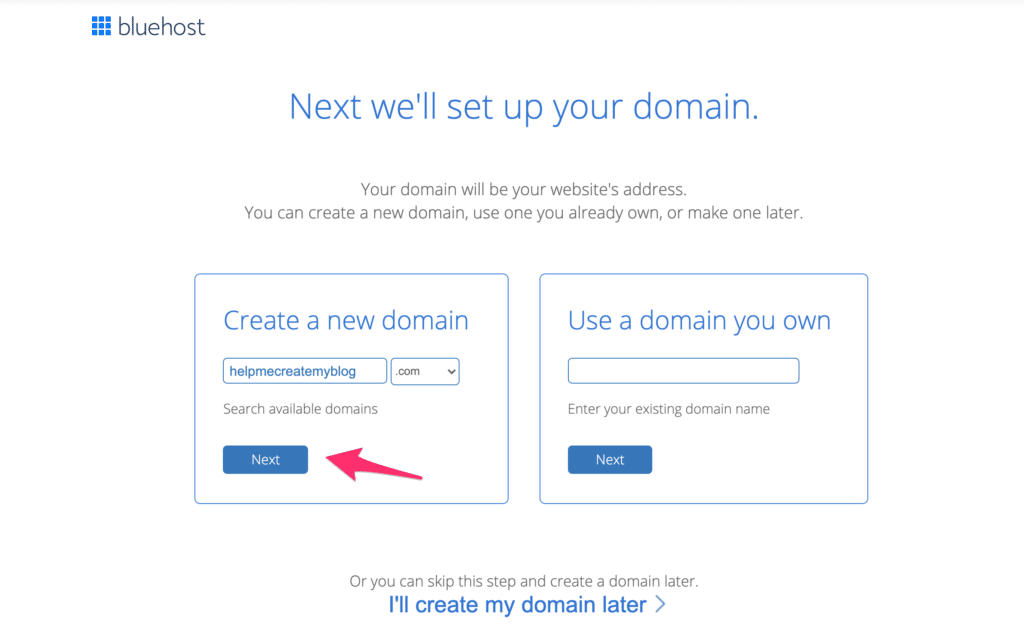
While entering the domain name, try choosing something relevant to your business.
For example, if your blog is about health and fitness, you should choose something healthynation.com or fitnessredefined.com.
Choose something short and simple that people can easily remember. Once done, click Next.
For example, my business is about helping people create a professional blog, so I have entered helpmecreatemyblog.com.
You may type in your desired domain name just like that in this tool to know if your domain name is available or not.
Try entering your desired domain name here, and then click the “Check Availability” button to see if you can grab that domain before anyone else does.
Step 3: Fill in your account details and create your hosting account.
When you click Proceed, you’ll need to review the information and complete the process of creating a hosting account.
Fill in your account details by entering your email and password. Then you need to fill in your personal details like first name, last name, street address, etc.
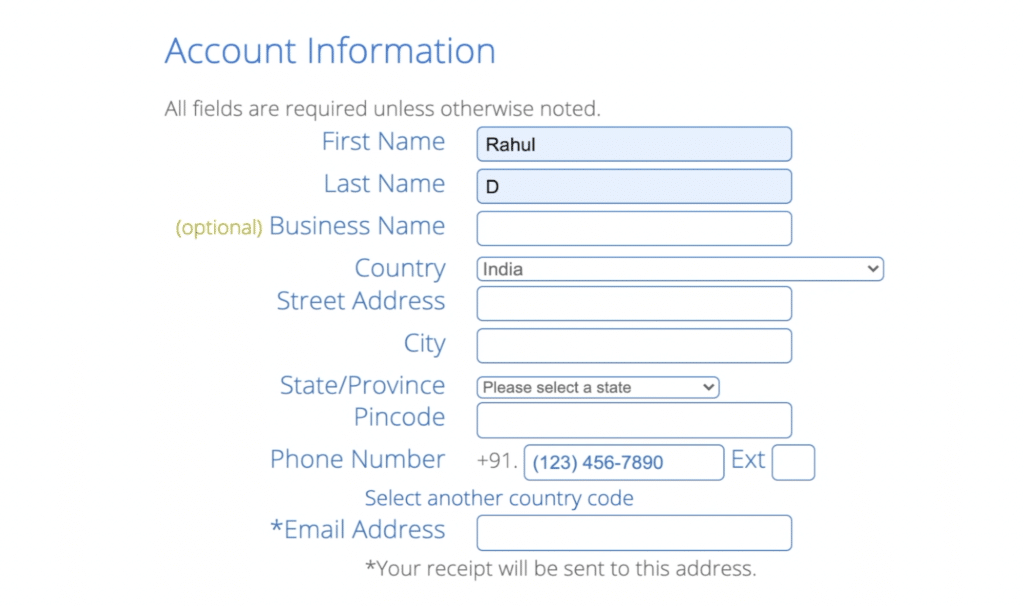
After that, you need to review and confirm package information for hosting services and extra services.
In the package information, check and confirm if you have selected the right plan, if not, you can change it here.
For the hosting period, I would recommend you choose 12 months or more because that’s how you’ll be able to get maximum discounts.
I have selected 36 months because that’s how it’s cheapest, and I’m able to get a hosting service at less than $3 per month.

Further, when you scroll down, you’ll see the Package Extras as well. Here you can decide whether you want any extra functionalities as well.
When I say “Extra”, it really means they are extra, and you don’t primarily need to pay for those extra functionalities. But in case you need any, you can check or uncheck based on your requirements.
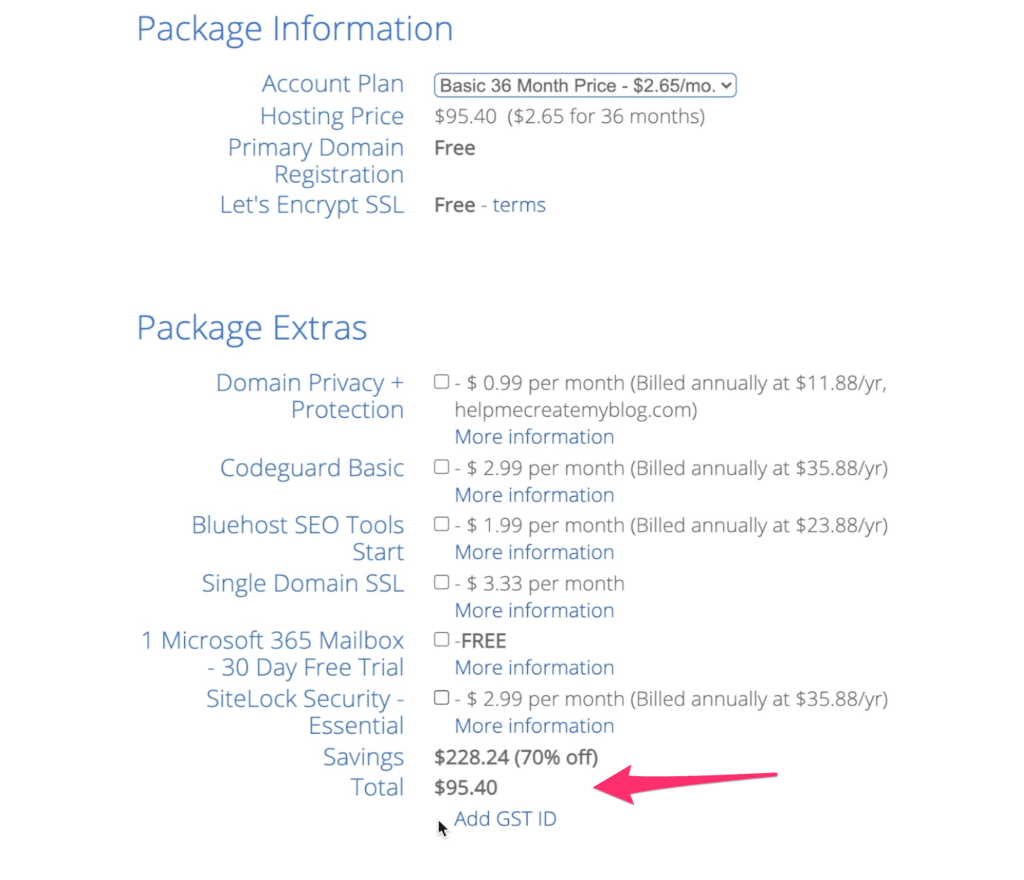
For example, if you want to keep your personal details private, check the box next to Domain Privacy +Protection. However, if domain privacy is not so important for you, keep that unchecked.
Also, keep the box next to Codeguard Basic, Bluehost SEO Tools, and SiteLock Security unchecked. As you keep unchecking them, you’ll notice that the total amount keeps on decreasing substantially.
Once you are done with that and happy with the total amount, you need to enter your payment information. Enter your debit card or credit card information.
The good thing is that Bluehost allows you to get a hosting account even if you don’t have a credit card. You can simply click on “more payment options” to see more payment methods like a PayPal account.
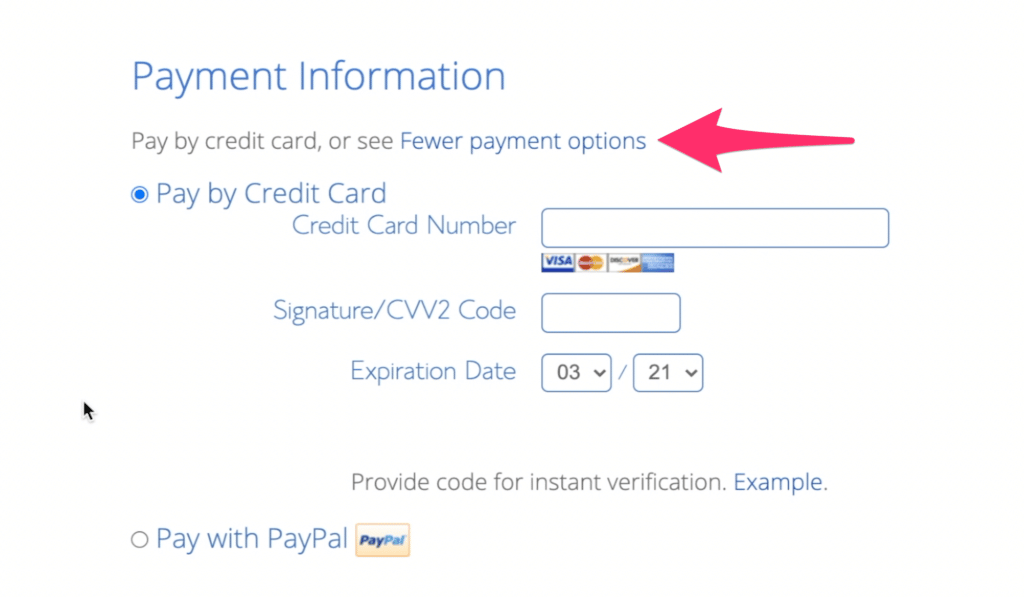
So simply enter your payment details and use your credit or debit card to pay hosting bills. Or alternatively, you can also use PayPal to purchase the hosting plan.
Finally, you need to confirm that you have read and agree to their terms of service and privacy policy. And then, click the Submit button to make payment.
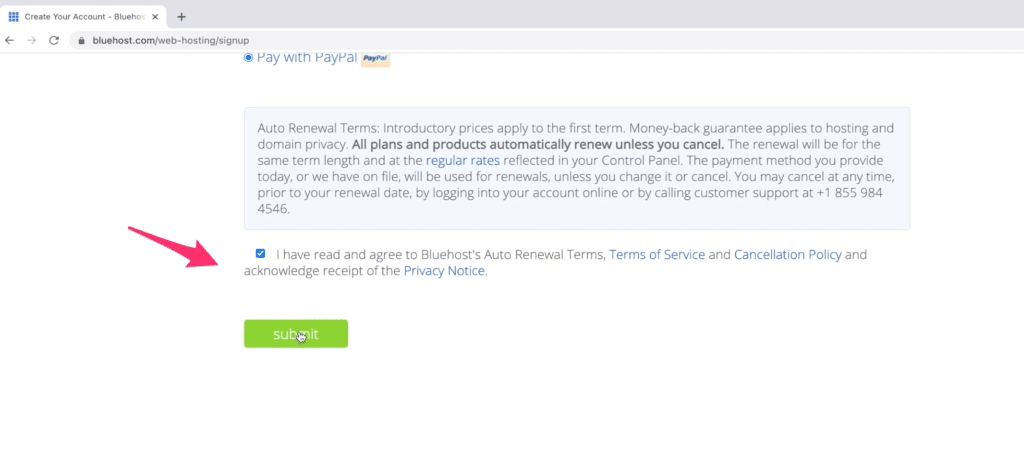
This will deduct the amount from your debit or credit card and your hosting account will be created. You’ll soon get a success message that will look like this:
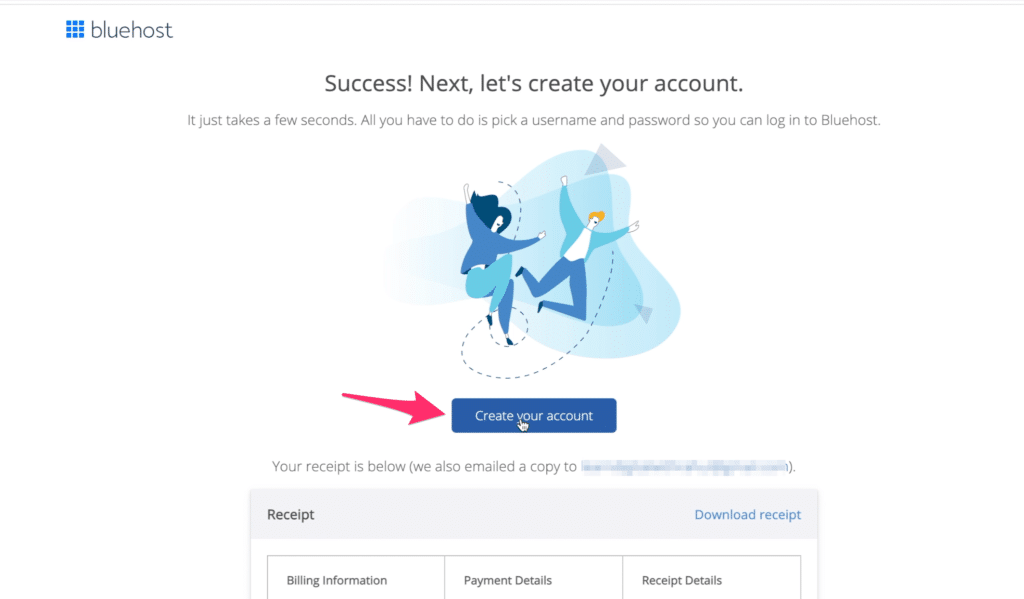
You’ll get a confirmation email about the same. Now, you need to click on Create Your Account button and this will take you to set up your hosting account.
Step #4 Set up your Hosting Account and Install WordPress on your Hosting Server
Now, it’s time to set up your hosting account and build your website. To set up your hosting account, you simply need to enter a new password and re-enter the password to confirm, then save changes.
Once done with setting up a new password for your hosting account, you can log in to this account with the new password that you just created.
And once you are logged in, you’ll see a welcome tour with some basic questions like this. This is just to help you build your site. I would simply skip all these steps.
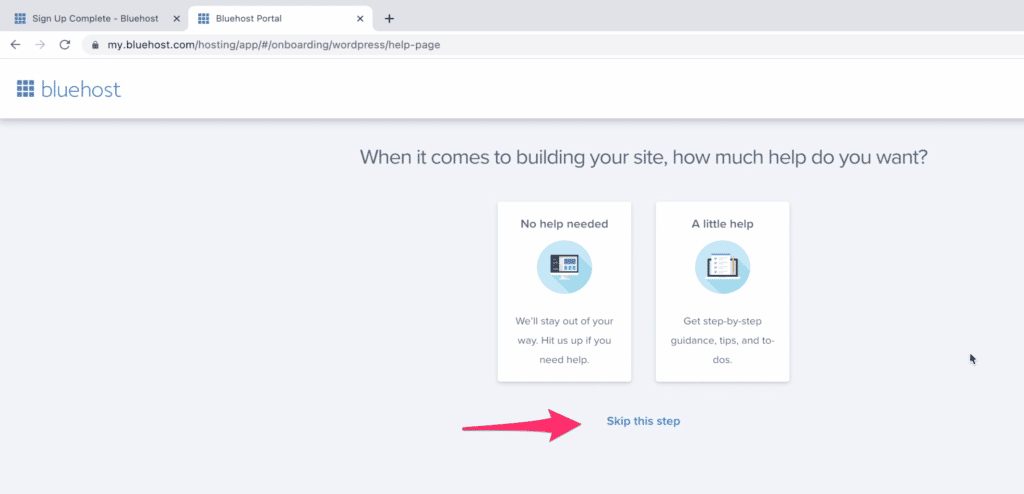
And before you build your website, let me remind you again so that you may understand, what you are going to do.
Since you are starting a new website, you should choose to start a new website, and then WordPress as the software to install. Needless to say, WordPress is the best blogging software, and we are installing WordPress on the hosting server.
Don’t worry! You don’t need technical skills or coding skills or install WordPress on your hosting server. Because Bluehost does it for you, you don’t have to do all the heavy lifting.
Simply follow the on-screen instructions, it’s pretty basic and self-explanatory.
Finally, you’ll be asked to choose a theme for your WordPress blog. You can choose between the two options:
- Free WordPress theme
- Premium WordPress theme
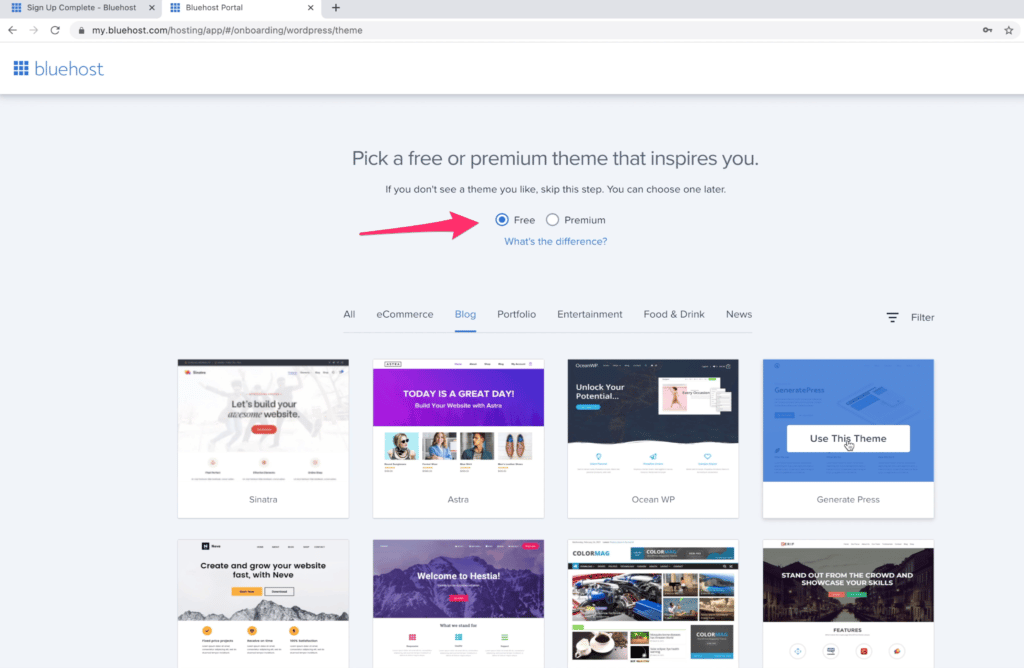
I would choose any free theme from the various free theme options available and quickly get started.
In case you want to use a premium theme, don’t worry, I’ll guide you on how you can change your blog theme in the latter part of this article. But for now, just choose anything and quickly get started to save time during WordPress installation.
When you choose any theme and click on “Use This Theme“, WordPress installation will start on your hosting server. And you are an inch closer to building your WordPress blog.
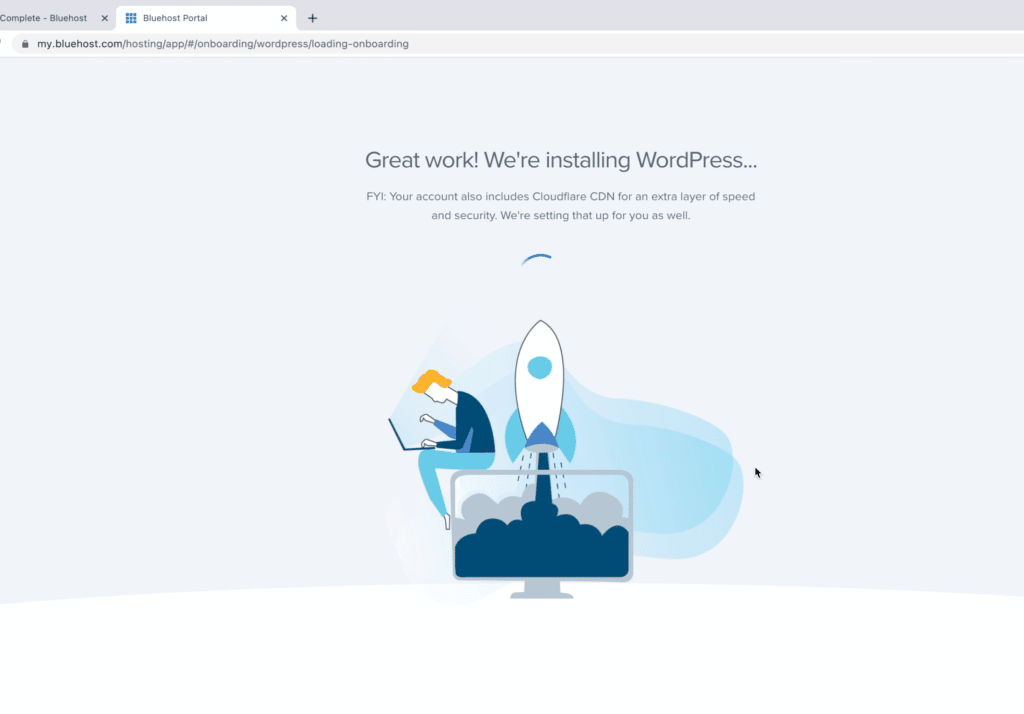
As soon as the WordPress installation is complete, you’ll be able to log in to your WordPress blog dashboard, however, the only issue is: currently, it has a temporary domain URL that looks ugly.
Therefore, you need to change your site URL to the custom domain that you purchased. This is very crucial. So pay close attention.
Here is how you can change your WordPress blog site URL quickly in 5 simple:
Step 1: Choose and click on “My Sites” from the left menu items. This will take you to the My Sites menu, where you can view and manage your sites.
Then click on the Manage Site option next to the site for which you want to make changes.
This will take you to the site overview page where you’ll see various tabs: Overview, Marketing Center, Users, Backups, Performance, Security, Plugins, and Settings. (watch the video above for a better understanding)
Step 2: Click on Settings and under the Settings tab, edit and enter the site URL. Type in the domain name that you want to set as your blog URL.
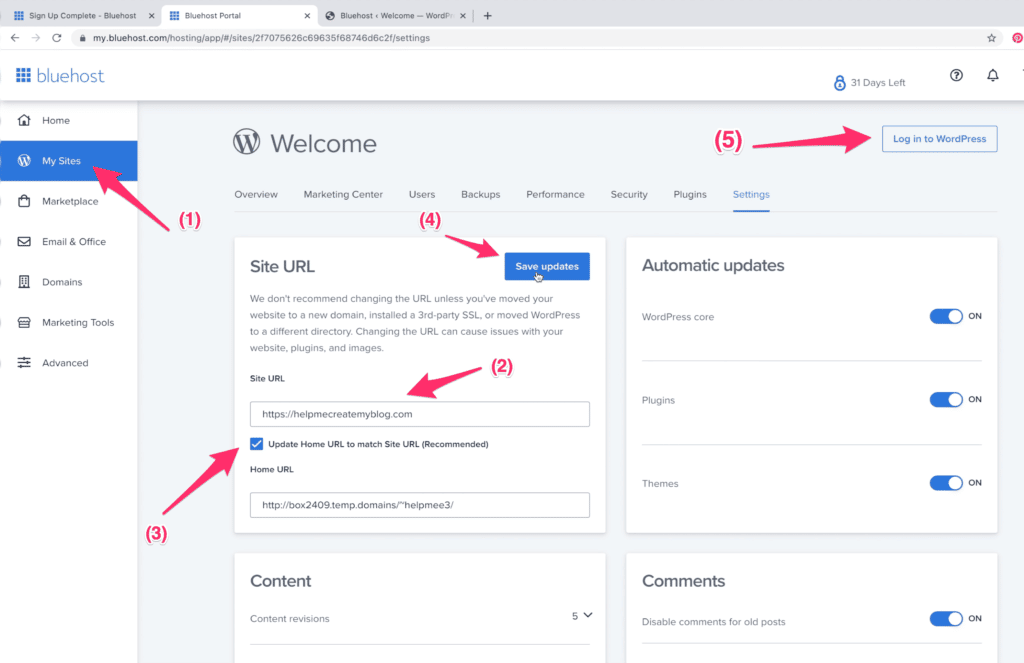
Step 3: Check the box next to Update Home URL to match the Site URL.
Step 4: Click on the Save Updates button to save the changes.
Step 5: Once you see the success message, finally, click on Log in to WordPress button (in the top right), and now you can log in to your new WordPress blog.
Alternatively, you can also log in to your new WordPress blog directly in a new tab of your browser. And I would highly recommend that option because that’s how you’ll log in to your blog every time later as well.
Therefore, it’s a better idea to learn how to log in to your WordPress blog.
To log in to your WordPress blog admin area, simply add /wp-admin/ at the end of your newly purchased domain, and then you’ll need to enter your username and password that you noted earlier.
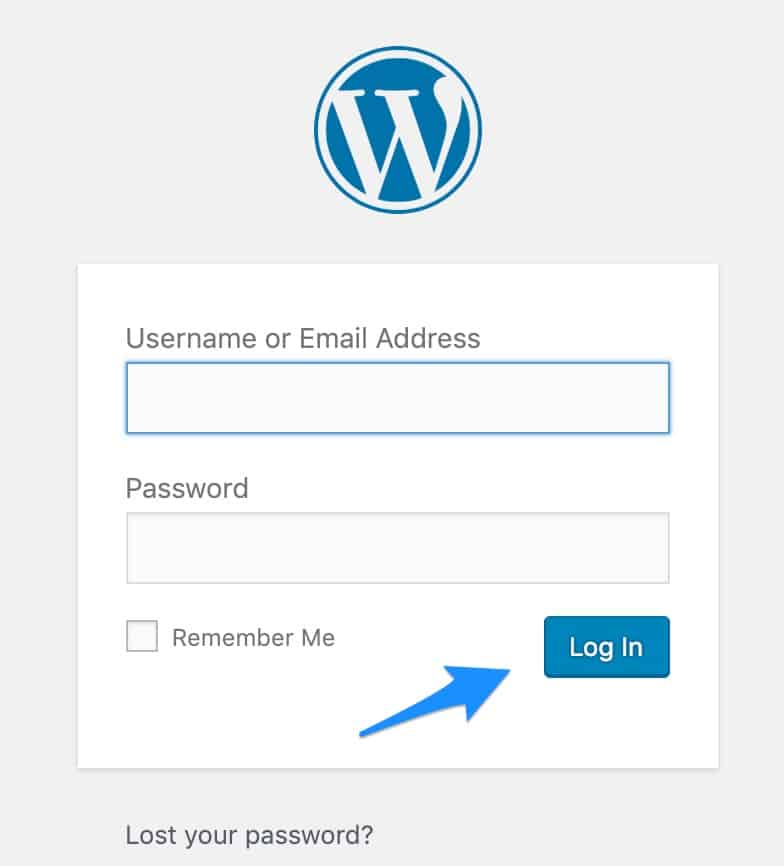
Click login and this will take you to your WordPress dashboard. Then, just follow the on-screen setup process, and you’ll get a congratulations message.
When you are on your WordPress dashboard admin area, it will look like this:
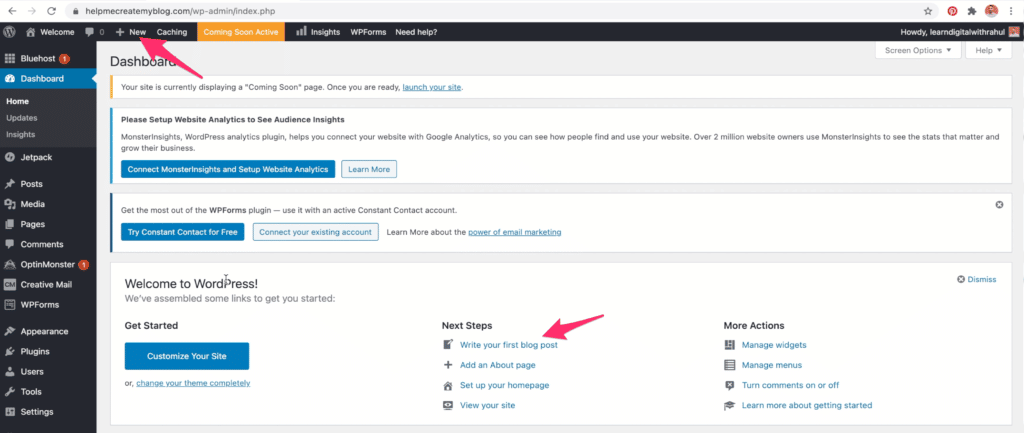
Congratulations! Now you are ready to start blogging.
You may simply hover over the +New button in the top menu bar and then select Post to start creating in post. Or alternatively, you can also click the “Write your first blog post” link to start writing your first blog post.
So we are done with creating a professional blog and installing WordPress on the server.
Now you can quickly start blogging if you want, but if you view your site design, chances are you won’t love the design. That’s because the default WordPress theme sucks in design.
Therefore, you need to work on design so that your new WordPress blog may look attractive.
Step #5: Change Your Blog Theme to Design a Beautiful Blog
Most people would spend lots of time on design and customizations. But you shouldn’t waste your time on that because there is a quick way to instantly make your new blog look attractive.
You can simply change your WordPress blog design by installing a new WordPress theme, and this is the easiest way to get a good-looking design for your WordPress blog.
Before I guide you with the steps to changing your WordPress theme, first understand which theme should you choose!
Which WordPress Theme is Best for Blogging?
WordPress repository has a large number of FREE themes available, but the problem with the FREE theme is: that it is not optimized for professional blogging.
Almost every FREE WordPress theme lacks the functionality of customization, so if you ever need to add more widgets or additional functionalities, you’ll have no way other than to switch to a premium theme.
I use the Genesis theme by StudioPress and I highly recommend you choose this over any other theme because Genesis is not just a theme but an entire theme framework, which means you can do almost anything with it.
No matter however the way you want your blog to look, you can simply make customizations in your child theme of Genesis, and you’ll be able to achieve the design you want.
Genesis is the one-stop solution for your blog design needs. If you choose Genesis, you’ll never have to change your theme again.
On top of all, it’s a very robust, lightweight, excellently coded WordPress theme built with speed and search engine optimization in mind.
It is also the most popular WordPress theme, as most industry experts use and recommend Genesis by StudioPress.
If you have the budget for a premium theme, go for Genesis, and you’ll never have to regret it later.
However, if you don’t have a budget, you can choose any FREE theme from MyThemeShop or ThemeForest.
How to Install a New WordPress Theme?
To install a new WordPress theme, go to your WordPress dashboard by simply entering /wp-admin/ at the end of your domain name and then entering the WordPress login details.
Once you are logged in, go to Appearance and then click Themes.
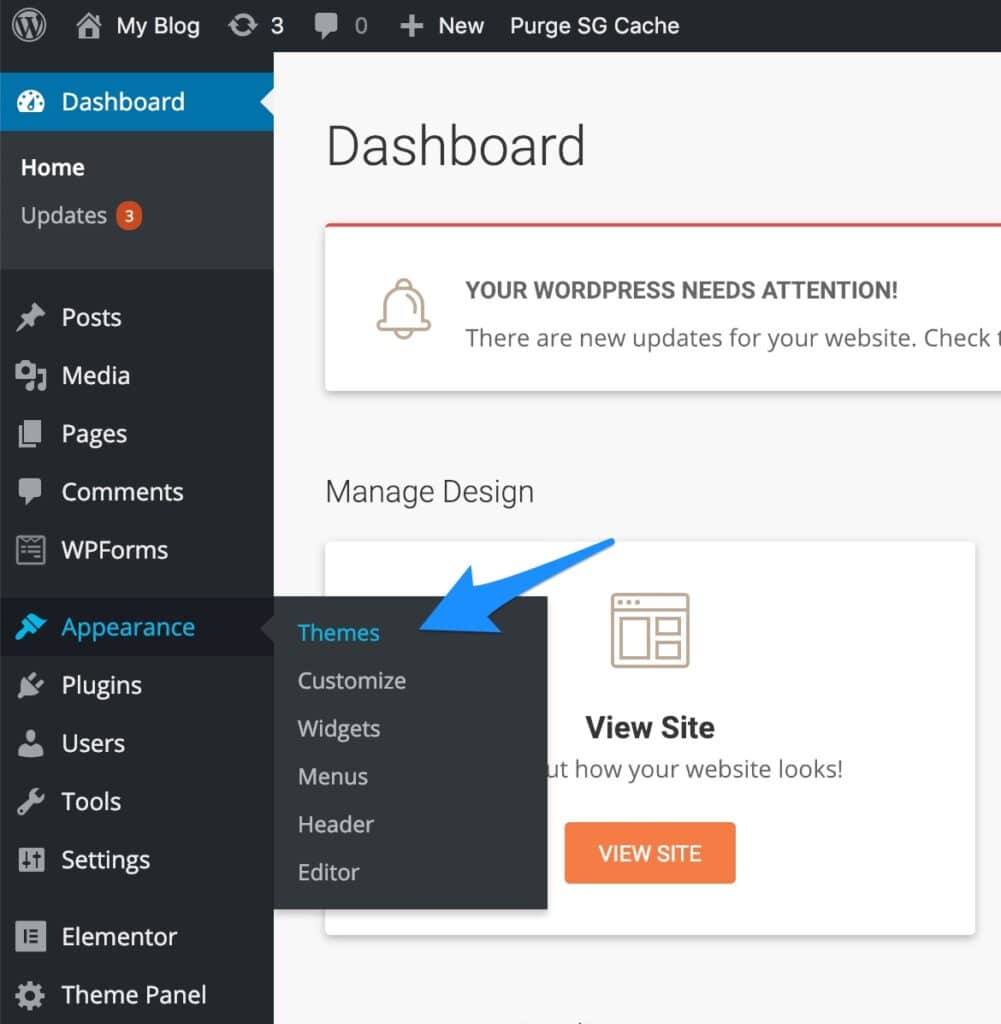
On the next screen, click on Add New, as shown in the image below:
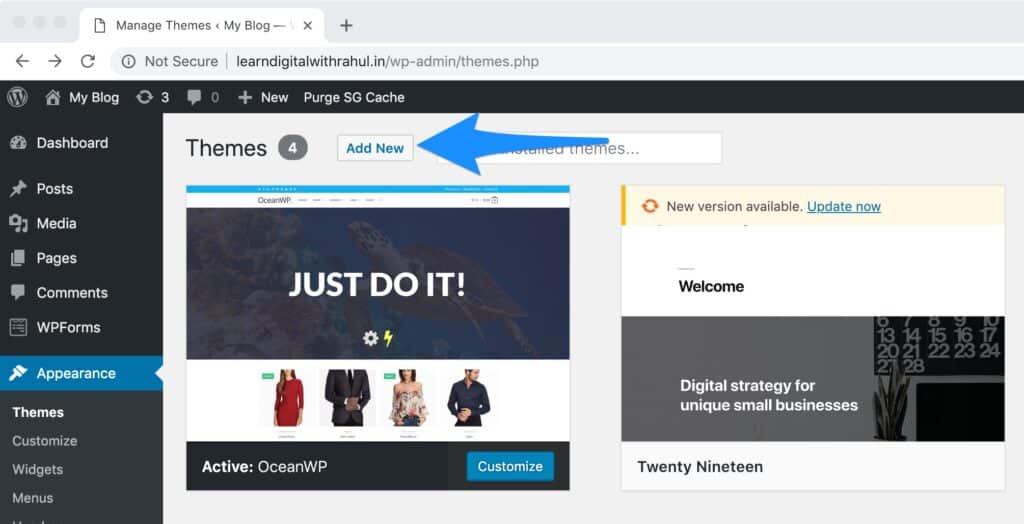
On the next screen, you’ll get the option to choose a theme. You can either click Upload Theme to upload the premium theme that you downloaded after purchase, or you can pick any FREE theme from the WordPress repository.
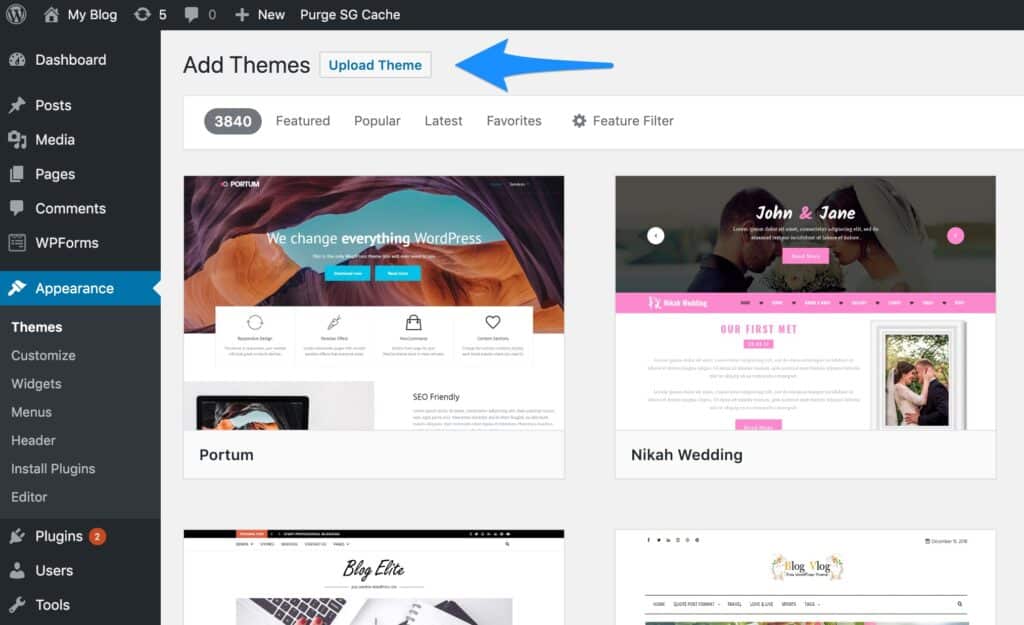
Once installed, click Activate and your new design will be live.
Congratulations! You just finished the WordPress installation and setup process and your new WordPress blog is ready for blogging.
Steps Ahead after Starting A New Blog:
So you just created your new blog and your WordPress blog is ready for blogging, now what?
Now, it’s time to start writing blog posts.
If you don’t know how to write your first blog post, you may consider watching this video:
Download this checklist to ensure that your first blog post is amazing.
Now start blogging and have fun!
Conclusion
Whenever people hear the term “make money blogging“ they dream of becoming a blogger and search for “how to start a free blog” in Google and Google shows them free blogging solutions like blogspot.com, WordPress.com, wix.com, etc.
While free blogging platforms are good for getting an overview of how blogging platforms work, they are never the right solution for professional blogging.
If you are dreaming of becoming a professional blogger and earning money from your blog, forget about free blogging platforms and start a self-hosted professional WordPress blog today.
Now that you have learned how to start a self-hosted WordPress blog, you should stop complaining and start acting because there is a lot to learn and earn in blogging, don’t waste time in analysis.
If you have any questions or need support, you may join Learn Digital with Rahul Private Facebook group and ask your question to get a quick answer.
![How to Start A Blog Step-by-Step in 2024? [Under 10 Minutes]](https://learndigitalwithrahul.com/wp-content/uploads/2021/03/How-to-Start-A-Blog-Start-A-Professional-WordPress-Blog-Step-by-Step-880x360.png)
Thanks Rahul For Sharing Such A Wonderful Information With Us I Have Learned A Lot Of Things From It And Now I Am Going To Imply It Too.
Hi Dinesh,
Your welcome!
I’m glad that you liked the information provided here. I’m sure you’ll be able to implement it for the best results. Do let me know how it goes.
If you have any questions or queries, I’m always here to help you.
Thanks!
Regards,
Rahul
Hi Rahul, The total amount you ended up paying was 65.35 dollars right??
Hi Olamide,
Yes, but that was several months ago. Recently, they increased their price and that’s why I updated this blog article with fresh and relevant information.
Hope you’ll like it.
I hope this helps! If you still have any questions, feel free to ask. I’ll try my best to help. 😊
Thanks!